Tuesday, April 24, 2012

Spicy Ramp Kati Roll

It's that time of the year. Spring has arrived and with it the rich bounty of ramps at the farmers markets!

Ever since ramp-mania began to show up on chef's menus everywhere a few years ago, this seasonal vegetable has been featured prominently on foodie blogs including mine. Beloved as much for its short life span (ranging from 4-6 weeks) as its intense garlicky flavor, I found this season's crop of ramps to particularly spicy.

My favorite way of eating ramps is a simple sauté. But since I found myself stockpiling on bunches of ramps galore, I decided that I didn't need to be stingy with my experimentations.  One of the best ways to feature ramps is definitely in a pesto. Since I had created a ramp pesto in the past, I wanted to give it a bit of an update and use it in an entrèe from one of my favorite cuisines that I rarely have unfortunately: an Indian kati roll. 

Generally, kati rolls are street food that are characterized as an Indian flat bread stuffed with a filling of your choice. They were introduced to NYC with much acclaim in Greenwich Village late night joint, Kati Roll in 2002 with many trying to replicate their success. A favorite with NYU students because of its proximity and a destination for after-hour eats after a night of drinking and dancing, you can usually expect to wait a bit to place your order. But it is always well worth the wait. The soft bread and crunchy crust on the outside with the delicious filling of your choice rolled up inside is so much better than the usual pizza or Grey's Papaya hot dog.

For the filling, I decided to go completely vegetarian with tofu, kale and ramps. Veggies, hope you're reading! This is a rarity for me because as much as I enjoy eating vegetarian food, I just like a bit of protein to my meals. However, I think Indian food always creates some of the best vegetarian dishes around so I felt it apropos to use tofu as my protein for the kati roll.

For my spicy ramp kati rolls, tofu is really great to use since it takes on the flavor of the marinade and ramps. You can also replace it with eggplant or portabello mushrooms. The kale leaf adds a tiny fresh crunch and the topping of tomatoes, cucumber, onion, and cilantro cools the heat of the pesto. The lemon juice brings all the flavors out and adds a nice zing to the roll. If you want to remove some of the heat, I would just leave out the Thai red chile I used in the pesto.

This is a great make ahead dish as it takes only a few minutes to cook the ramps, tofu and paratha. Have all the ingredients together and a yummy meal will be ready for you in minutes even if you are on the go!
The frenzy for ramps at Union Square Farmer's Market in NYC.
SPICY RAMP KATI ROLLS
Serves 4

INGREDIENTS
Spicy Asian ramp pesto (makes 2 cups):
1 bunch ramp, leaves only (reserve stem & bulbs for another use)
1 cup mint
2 whole garlic cloves, peeled
1 Thai red chile, seeded
1/2 cup unsalted peanuts
Zest of 2 limes
Juice of 1 lime
1 tbsp fish sauce
1 tsp sugar
1/2 tsp salt
3/4 cup extra virgin olive oil

Kati Rolls:
16 slices extra firm tofu, cut into medium size rectangles 1/2" thick
1 1/4 cups spicy ramp pesto
1/2 Persian cucumbers, peeled and diced finely
1/4 cup grape tomatoes, diced finely
2 tbsp Vidalia onions, diced finely
Juice of 1/2 lemon
12 ramp stalks, cleaned and quartered
4 tbsp grape seed oil
4 frozen paratha or Indian flat bread
4 pieces raw kale, rib removed
1/4 cup roughly chopped cilantro
2 tbsp raw ramp leaves, sliced into thin strips (optional)

DIRECTIONS
For pesto:
1. In a food processor, add all ingredients except olive oil. On high, blend it together and slowly add oil into the mixture. Process for several minutes until it reaches the right consistency. Add more oil as needed.

2. Refrigerate in a sealed jar until ready to use. Keeps well for 2-3 weeks.


For Kati Roll:
1. In a large ziplock bag, marinade tofu with 1 cup pesto for at least 4 hours or overnight. Make sure each piece is well covered.

2. In a small mixing bowl, add onion, tomatoes, cucumber and lemon juice. Season lightly with freshly ground black peppercorn. Cover and refrigerate until ready to use.

3. Pre-heat an oiled cast iron skillet. Add ramps once hot and char on both sides. Remove from heat and put aside until ready to use.

4. Put tofu on the skillet at an angle so it creates nice char marks. Grill for 2-3 minutes on each side until it is creates golden brown marks. Make sure your fan or window is open as it will get smoky! Turn off heat and keep to the side until ready to plate.


5. In a skillet, warm up 1 tbsp oil over medium high heat. Cook the paratha on each side for approximately 3-4 minutes until golden brown and crusty on both sides. Repeat with each paratha.

6. To plate, lay paratha flat and smear the remaining pesto evenly along center of bread. Next, lay 1 pc of raw kale on top followed by 3 ramps. Lay 4 pieces of cooked tofu at a diagonal. Sprinkle with onion, cucumber and tomato mixture and cilantro-ramp. Repeat with the last 3 rolls. Serve immediately.

Happy eating!


Thursday, April 12, 2012

Thai Yellow Curry Fried Rice

I was away from home for the most part of February into March traveling for work.  And when I'm away, all I do while I'm indulging in all my work-expensed meals is daydreaming about the first thing I'm going to cook when I'm back home.  While I was in my hotel in West Hollywood, I was visiting the Mistress of Spice's blog when I stumbled upon her Thai red curry fried rice.

Drooling while I re-read the post, I made a promise to go home and use the red curry I had brought back from one of my food shopping trips in Paris at the food mecca, Lafayette Gourmet at Galeries Lafayette.  Fried rice is a real comfort food me growing up in my Taiwanese household.  It is a great way to use leftover white rice as it gives it new life. The only time my mom ever made fried rice with us was if she needed to use up rice that was a few days old.  She never used freshly made rice as it contains too much moisture and doesn't allow the rice to crisp up that much. Once I was old enough to start helping my mom in the kitchen as a teenager, I was given the responsibility of making the rice in the cooker. I would deliberately cook more rice than needed so that my mom would be forced to make us fried rice that week! It was (and still is!) my favorite dish to make at home, though my variation is slightly different from my mom's now.

So two days after I found myself back home in my lovely, tiny studio (there really is no place like home!) I stopped by my local Chinese spot to pick up a pint of white rice since I had run out of my jasmine rice right before I left for my work travels.  I opened my fridge and pulled out the curry paste to find I didn't have red curry, but YELLOW curry. No problem! A quick look through my fridge and freezer and I pulled out some coconut flakes, an egg, leftover grape tomatoes, chicken breasts and a kaffir lime leaf...the holy grail that holds that umami flavor in Thai cooking next to fish sauce.

Since yellow curry has a slightly sweeter taste to its heat, the coconut was the perfect complement for it. Once I toasted them a beautiful golden brown, it also added a nice textural contrast in the dish. You can adjust the level of heat by reducing/increasing the curry paste. I thought mine was just the right amount of heat without making it painful to eat! Feel free to substitute the chicken with eggplant or tofu if you do not eat meat.  If you are trying to be more health conscious, brown rice is also perfectly acceptable; it will probably add a nice nutty flavor. I have just never learned to like brown rice having eaten white rice my entire life.

This weekend is the MOST appropriate time to cook this dish for yourself or your family as today signifies the beginning of the Songkran Festival (otherwise known as Thailand Water Festival).  It is the most important festival for Thai people. Celebrated as the traditional Thai New Year, the Thai people sprinkle water on the elders in show of respect and pay respect to Buddha images. This year Songkran will run from Thursday, April 12th-Sunday, April 15th.  So get out there with your water guns in tow and then satisfy your hunger afterwards with this comforting dish!
Celebration of Songkran in the streets of Chiang Mai. - Photo by Ramya Vivekanandan


THAI YELLOW CURRY FRIED RICE
Serves 4

INGREDIENTS
3 tbsp coconut flakes, lightly toasted
2 tbsp grapeseed oil
1 large egg, beaten
2 medium size boneless, skinless chicken breasts, thinly sliced
1/2 cup yellow onion, diced
3 garlic cloves, peeled and thinly sliced
1 tbsp ginger, finely minced
1/4 cup cherry or grape tomatoes, halved
2 kaffir lime leaves
2 tbsp yellow curry paste
3 tbsp water
2 cups leftover white rice
1 lime, quartered

DIRECTIONS
1.  In a large wok, toast the coconut flakes over medium heat until they are golden brown and have started to caramelize a bit around the edges. Remove from heat and reserve until ready to use.

2.  In the same wok, warm oil over high heat and add eggs. Roll around pan and cook for a few minutes.  It should still be somewhat uncooked.  Do not let brown on bottom. Remove from heat and reserve until ready to use.

3. Still using the same wok over medium-high heat, add the chicken.  Cook until both sides are no longer pink. Add onion and cook until slightly translucent. Then, add garlic, ginger, tomatoes, and kaffir lime leaves. Saute together for a minute. Add curry paste and water; mix together.

4. Raise heat to high, add rice and eggs. Make sure everything is mixed together.  I always like to make sure every grain of rice has a bit of the sauce and ingredients are evenly distributed so you get a bite of everything together.  Cook for an additional 4-5 minutes over high and stir occasionally to avoid rice from sticking to the bottom.  It's perfect if it starts to create a bit of crust on the rice, but we don't want it to stick! Add 2 tbsp coconut flakes to the rice and mix together one last time.

5. Remove kaffir lime leaves from the wok. Serve immediately in individual bowls and top with toasted coconut flakes and a wedge of lime.


Kŏr hâi jà-rern aa-hăan or bon appetit!!

Friday, April 6, 2012

Lime-Lavender Madeleines: An Easter Treat from the South of France

For those of you who are wondering, what exactly is a madeleine?  You'll probably recognize them as those somewhat stale, overly sweet, kind of cake-like, shell-shaped treats that you find at your local Starbucks and Costco. Originating from the Lorraine region in northeastern France, madeleines are usually more sponge-like cakes. Much lighter and fluffier (and buttery!) in their native country, madeleines are delicious to eat alongside your morning/afternoon cup of tea or dipped into your cafe créme.

I adapted a madeleine recipe I found in one of my old Gourmet issues and changed it to suit my purposes. To me, nothing shouts spring and the memories of southern France than lavender.  I have no idea why. But the delicate purple blossoms and light floral scent that is not too sweet or cloying just embodies the warmth of the healing spring sun.  Known for its medicinal and herbal properties, lavender has been used for various things such as burns, insect bites and more commonly to relax the mind and induce sleep. Paired with the sharp, cleansing citrus zing of limes, it perfectly offsets the herbaceousness of the lavender.

The sugar and butter gives the madeleines a natural caramelization alongside the edges and has a slight crisp when you first bite into it.

This recipe is the perfect way to start off your Easter morning while the kids are all outside hunting the eggs all of the adults hid earlier in the day. Brew up a cup of your morning joe, dunk your lime-lavender madeleine, bite, and slowly savor the morning sun on your face and the taste of spring and Provence on your tongue.
View of sunflower fields from the train going through Provence-Alpes-Côte d'Azur region.
I hope that everyone has a safe and wonderful Easter with their families and loved ones! I know that I am looking forward to some glazed ham and deviled eggs alongside with a light snack of these madeleines with tea to unwind while everything cooks in my kitchen.

LIME-LAVENDER MADELEINES
Makes 16

INGREDIENTS
2 large eggs
1/3 cup granulated white sugar
1/3 cup organic agave syrup
Zest from 2 limes
1/2 tsp lavender, crushed
Pinch of salt
1/8 tsp baking powder
1 cup flour
1 stick (8 tbsp) unsalted butter, melted and cooled slightly

Glaze:
2 tbsp powdered sugar
1 lime, juiced
DIRECTIONS
1. Preheat oven to 375 degrees Fahrenheit.

2. In a large non-reactive bowl, whisk together eggs, sugar and agave syrup. Add in lime zest, lavender, baking powder and salt. Mix again.

3. Slowly add in flour. Whisk until incorporated before adding more. Slowly add in butter, whisking it all in.

4. Butter each mold to avoid any issues of sticking. Fill each madeleine mold with the batter to the top. Bake for 14 minutes until lightly golden on top with a nice caramelized brown crust along the edges. Always remember to butter the mold before doing the next batch.

5. While madeleine is baking, whisk together powdered sugar and lime juice in a small bowl. Put aside until ready to use.

6. Take madeleines out and let cool for a few minutes before popping them out. While warm, immediately brush the tops with the lime glaze. Let cool completely.

Tuesday, April 3, 2012

ITALIAN WEDDING SOUP

Hello readers! I feel like I am constantly apologizing for disappearing for weeks at a time. But I promise that at least for the next few months you have my undivided attention. :)

Unfortunately, the last bit of winter continues to linger here in New York. The plus side is that I can continue comfortably having my soup without sweat dripping down my face. Yes, a pretty sight I know.

I try to cook for my dog Tyler at least once a week. I know it sounds crazy, but it is cheaper and I control exactly what goes into it. I started doing it last year and came up with a really easy mini meatball recipe made with a heart conscious ground chicken that he loves. It makes so many mini meatballs that I decided to just use the rest for myself after I made his batch (after I add salt for myself of course!). You can use your fingers to roll the meatballs or melon baller if you have one on hand.

I love making meatballs. I don't know why I never thought of making it sooner since they're so easy and I can definitely make them more health conscious. With my beach bachelorettes and weddings this summer, it is definitely weighing heavily on me.

There's no better way for me to enjoy mini meatballs except in an Italian wedding soup. Tasty little meatballs floating in an herby clear broth among the tiny tubes of pasta and sweet vegetables and finished with just a squeeze of fresh lemon and shredded parmesan. It makes my mouth drool thinking of it and the perfect soup to deals spring! The lemon is not necessary but I think it brings a citrusy zing to the soup and gives it a clean taste.

You will definitely have leftover mini meatballs. Just store them in a sealed Ziploc freezer bag and take them out anytime you need them: spaghetti and meatballs, Swedish meatballs, meatball skewers for your next cocktail party, etc etc. They are so handy to have around in your freezer!

This Italian wedding soup is great to make the night before as all the flavors come together overnight. It is also a perfect way to use up leftover pasta. Happy Friday everyone!
ITALIAN WEDDING SOUP
Serves 4

INGREDIENTS
For mini meatballs (makes 5 dozen):
1/2 lb ground chicken
1 large egg
1/2 cup panko or breadcrumbs
1 tsp herbes de Provence
1/2 tsp fennel seeds
1/4 cup shredded Parmesan
1/2 tsp sea salt
1/4 tsp freshly ground pepper

For soup:
1 tbsp olive oil
1 carrot, peeled and sliced 1/2-inch thick
1 fennel stem, sliced 1/2-inch thick (fronds reserved)
1/2 onion finely diced
2 cloves garlic, thinly sliced
1/2 tsp fennel seeds
1/2 tsp dried rosemary
1/4 tsp red chile flakes
4 cups low sodium chicken broth or homemade stock
1/2 bunch fresh spinach or 1 1/2 cup frozen spinach
20 mini-chicken meatballs
1 cup cooked whole wheat piccolini or small whole wheat pasta
Salt and freshly ground mixed peppercorns
1 lemon, quartered
Shredded Parmesan to top (optional)

DIRECTIONS
For meatballs:
1. In a large non-reactive bowl, add ground chicken and all dry ingredients. Using your hands, mix together. Add egg and mix until well-blended.

2. Using your fingers or melon baller, form gumball size mini meatballs. Place evenly on cooking sheet lined with aluminum foil for easy clean up. Refrigerate for an hour to allow them to firm up.
3. Preheat oven to 375 degrees Fahrenheit.

4. Place cookie sheet with meatballs in oven and bake for 15-20 minutes until lightly browned on top. Let cool. Reserve meatballs to be used and soup and freeze balance once it comes to room temperature.

For soup:
1. In a stockpot, warm oil over medium heat. Add carrot, onion, fennel and garlic. Sauté for approximately 3-5 minutes until vegetables start browning a bit.

2. Add herbs to vegetable mixture. Stir together and then add spinach. Bring heat to medium high, add broth and bring to a boil. Once it has come to a boil, bring it to low heat, cover the pot and let simmer for 30-45 minutes. This allows all the flavors to really come together.

3. Add pasta and meatballs. Cook for an additional 10 minutes. Season with salt and pepper to taste.

4. Ladle equal proportions in a bowl and top with Parmesan and a wedge of lemon. Serve immediately while hot.

Monday, February 20, 2012

The Big Easy, Mint Juleps & Hurricanes

With Mardi Gras starting tomorrow, I am reliving my Christmas vacation with my favorite people in New Orleans this past year.  Usually around the holidays, we find ourselves hankering for a beach vacation laying under the sun and getting away from the cold of the Northeast.  Unfortunately, it seems that most of the US had the same thoughts.  So our plans for a siesta in Mexico was panned for this year and we turned our sights on cities that were less coveted around this time of the year.

A few places were thrown around, but we all agreed wholeheartedly on New Orleans.  It was somewhat warm (so we thought) and lots of nightlife and great food. For most of us, it had been our first trip to New Orleans so we had no idea what to expect. We discovered it was the land of food porn. Yes, that's right. You heard me...food porn!  From charbroiled oysters to po' boys to gumbo and $0.25 martinis at the stately Commander's Palace....the Big Easy is a great city to head to if you love food.  We definitely came away from our trip about 10 lbs heavier, but man did we enjoy ourselves!

The slower pace of life took a bit of getting used to coming from the Northeast.  There is a reason why it is nicknamed the Big Easy after all.  Once we did though we were really able to enjoy ourselves and see the tidbits of what makes New Orleans and its inhabitants so special. A combination of genteel Cajun French charm, voodoo superstitions, ghostly traditions and a joie de vivre that trickled down to every aspect of their lives from music, arts, architecture into their cuisine, New Orlean-eans embrace their colorful history. Creole cuisine is literally an amalgamation of everything good that Cajuns took from the various influences that touched their part of the world. 
My liquor of choice these past few months is anything bourbon based. With the resurgence of old school and innovative cocktails popping up at various bars in New York like Employees Only, PDT or Death & Co it has been really easy to find some really fantastic drinks using it and, my other new-found love, bitters.  To me, bourbon is featured best in the mint julep.  This old fashioned drink is nothing more than muddled mint, sugar and simple syrup served with good bourbon in a chilled glass of crushed ice topped with a sprig of fresh mint. While traditionally, a mint julep is associated with Kentucky and the Kentucky Derby, the origins are actually unknown; though it definitely surfaced in the South during the 18th century. 

Bar Tonique
My first (and last!) hurricane.
You will see mint juleps abound in various bars and restaurants in New Orleans.  Though some say Pat O'Brien's (home of the original hurricane) has the best in town, I found myself sipping an amazing glass at Bar Tonique on a quiet residential street close to the edge of the French Quarters. 

A few blocks away from Bourbon Street, it is a haven away from the general rowdy tackiness of Bourbon Street.  While we did enjoy ourselves a few (bad!) hurricanes on Bourbon Street and found ourselves in a "club" dancing and drinking at 6pm, sometimes you just need a nice place to park ourselves and just enjoy a well-made cocktail. With pages of finely honed cocktails, Bar Tonique definitely offers that to their discerning customers. 

In the summer, there is nothing better than a glass of strong mint julep to while away a lazy, muggy afternoon hiding away in your air-conditioned home.  Though it is definitely winter here in NYC, I found myself this weekend with a craving for some mint julep to bring back those hedonistic memories of New Orleans. The smoky honey flavor from the bourbon mixed in with the refreshing mint juices makes for one of the most perfect drinks. There is a certain Southern charm in drinking a mint julep the proper way, straight from a silver pewter cup.  Unfortunately, after checking my neighborhood Sur La Table and Williams-Sonoma and failing to find what I wanted, a friendly employee guided me towards a tall tumbler in replacement. 
While there was no silver cup, my mint julep was the perfect way to end the weekend and console myself with working on President's Day. In the words of one smart Cajun Frenchman, "Laissez les bon temps rouler!" ("Let the good times roll!")

MINT JULEP
Makes 1

INGREDIENTS
1/2 tsp granulated sugar
1/2 oz simple syrup *
12 fresh mint leaves
2 oz bourbon
Crushed ice

DIRECTIONS
1. In a tall tumbler, add sugar, simple syrup and mint leaves.  Using a muddler or the end of a wooden spoon, muddle everything until natural juices are released.
2.  Add ice and bourbon. Top with a sprig of mint and serve immediately. Using a swizzle stick, gently mix it together. 

See below for my photo montage of all things good in New Orleans and a mini-index of some of the places we found ourselves in a few short days.

Turtle Soup and $0.25 martinis at the legendary Commander's Palace.
Scenes from the French Quarters and Bourbon Street. 
Cracklin' duck confit at Cochon.
Pan fried rabbit at K Paul's. 

Fluffy beignets at the legendary Café du Monde.

Amazing charbroiled Louisiana shrimp at August
Cruisin' down the Bayou.
 
One of the unusual, new solar homes being built in the Ninth Ward post-Katrina.


DINING
August
301 Tchoupitoulas Street
New Orleans, LA 70130
(504) 299-9777

Café du Monde 
800 Decatur Street,
New Orleans, LA 70116
(504) 525-4544

Cochon
930 Tchoupitoulas Street
New Orleans, LA 70130
(504) 588-2123


Commander's Palace
1403 Washington Avenue
New Orleans, LA 70130
(504) 899-8221


Felix's Restaurant & Oyster Bar 
739 Iberville Street
New Orleans, LA 70130
(504) 522-4440


K Paul's Louisiana Kitchen
416 Chartres Street
New Orleans, LA 70130
(504) 596-2530

Willie Mae's Scotch House
2401 St Ann St New Orleans, LA 70119
(504) 822-9503

GOING OUT
Bar Tonique
820 North Rampart Street
New Orleans, LA 70116
(504) 324-6045

623 Frenchmen Street
New Orleans, LA 70116
(206) 337-3273

Sunday, February 12, 2012

Double Coconut Brownies

Readers, as promised! My Valentine's Day dessert post...a treat for your sweet that should satisfy all cravings.

A wise friend once told me that all good things come from Portugal. He made some good points and to this day I will still argue with him that all things good are actually from China. Of course, that's because he's Portugese and I'm Chinese. However, in this case he is correct and I will give him his due (as much as it pains me.) The origins of coconut, it appears, is derived from the Spanish and Portugese word in the 16th century "coco" meaning grinning face for the three holes resembling a smiling human face. And after taking your first bite of this light, yet rich, double coconut brownie, that is exactly what your face will look like.

The thing I love about cooking is experimenting. I've always found that that is when you make the best discoveries.
Last week, I had a craving for brownies. But I got home and found that I had no milk or vegetable oil. Pretty important ingredients next to the chocolate. I could have gone around the corner to the supermarket to pick them up, but I was in one of those moods where walking 500 feet was too difficult. I was a little down and rethinking my dessert when I stumbled upon a can of coconut milk in my pantry. Score!


Coconut milk is so creamy and luscious that I thought it would be a good replacement for the milk and oil. What I discovered was that the coconut milk gave the brownies a refreshing and moist texture. In fact, why hadn't I had a brownie made with coconut milk before??  The unusual finish to the brownie with the addition of the coconut milk will definitely have your guest trying to capture and identify that elusive flavor. I love the warmth contrasting the coolness with the subtle hint of cinnamon and cardamom.

I finished it with a dark chocolate glaze and some toasted coconut to add another dimension and texture. It gave it a decadence that was tempered with the coconut milk. Delicious!  It is the perfect dessert to finish your Valentine's dinner with your loved one. Nothing shows love better than some chocolatey goodness!

DOUBLE COCONUT BROWNIES
Makes 16 brownies

INGREDIENTS
4 tbsp unsalted butter, room temperature
3/4 cup granulated white sugar
2 large eggs
1 tsp vanilla extract
1 cup white flour
1/2 cup unsweetened cocoa powder
1 tsp baking powder
1 tsp ground cardamom
1 tsp ground Saigon cinnamon
1/2 tsp kosher salt
14 fl oz (1 can) coconut milk
1 cup bittersweet chocolate chips
1 cup coconut flakes, toasted

DIRECTIONS
1. Preheat oven to 375 degrees Fahrenheit.

2. In a medium mixing bowl, whisk together flour, cocoa, baking powder, salt, cardamom, and cinnamon.

3. In a mixer on medium, cream sugar and butter until it has come together. Add vanilla and one egg at a time until fully incorporated. Add 12 oz of coconut milk and mix for a few minutes.

4. Bring mixer speed to low and slowly add the dry mixture to the wet. Mix until fully incorporated for several minutes.

5. Pour into a buttered/oiled 8x8 baking pan. Bake for 30 minutes until it is set. If you use a toothpick and stick it in center of brownie, it should come out clean. Remove from oven and let cool.

6. In a double boiler, add chocolate and remaining 2 oz coconut milk over medium-low heat. You can also put it in a microwave and in 15 second intervals slowly melt the chocolate and mix together it smooth and velvety.
7. Pour the chocolate over the brownies and smooth evenly. Top it with the toasted coconut. Refrigerate for about an hour for the glaze to harden a bit.

8. With a sharp non-serrated knife, cut into 16 pieces or 12 pieces if you want it bigger. Serve slightly chilled.


Friday, February 10, 2012

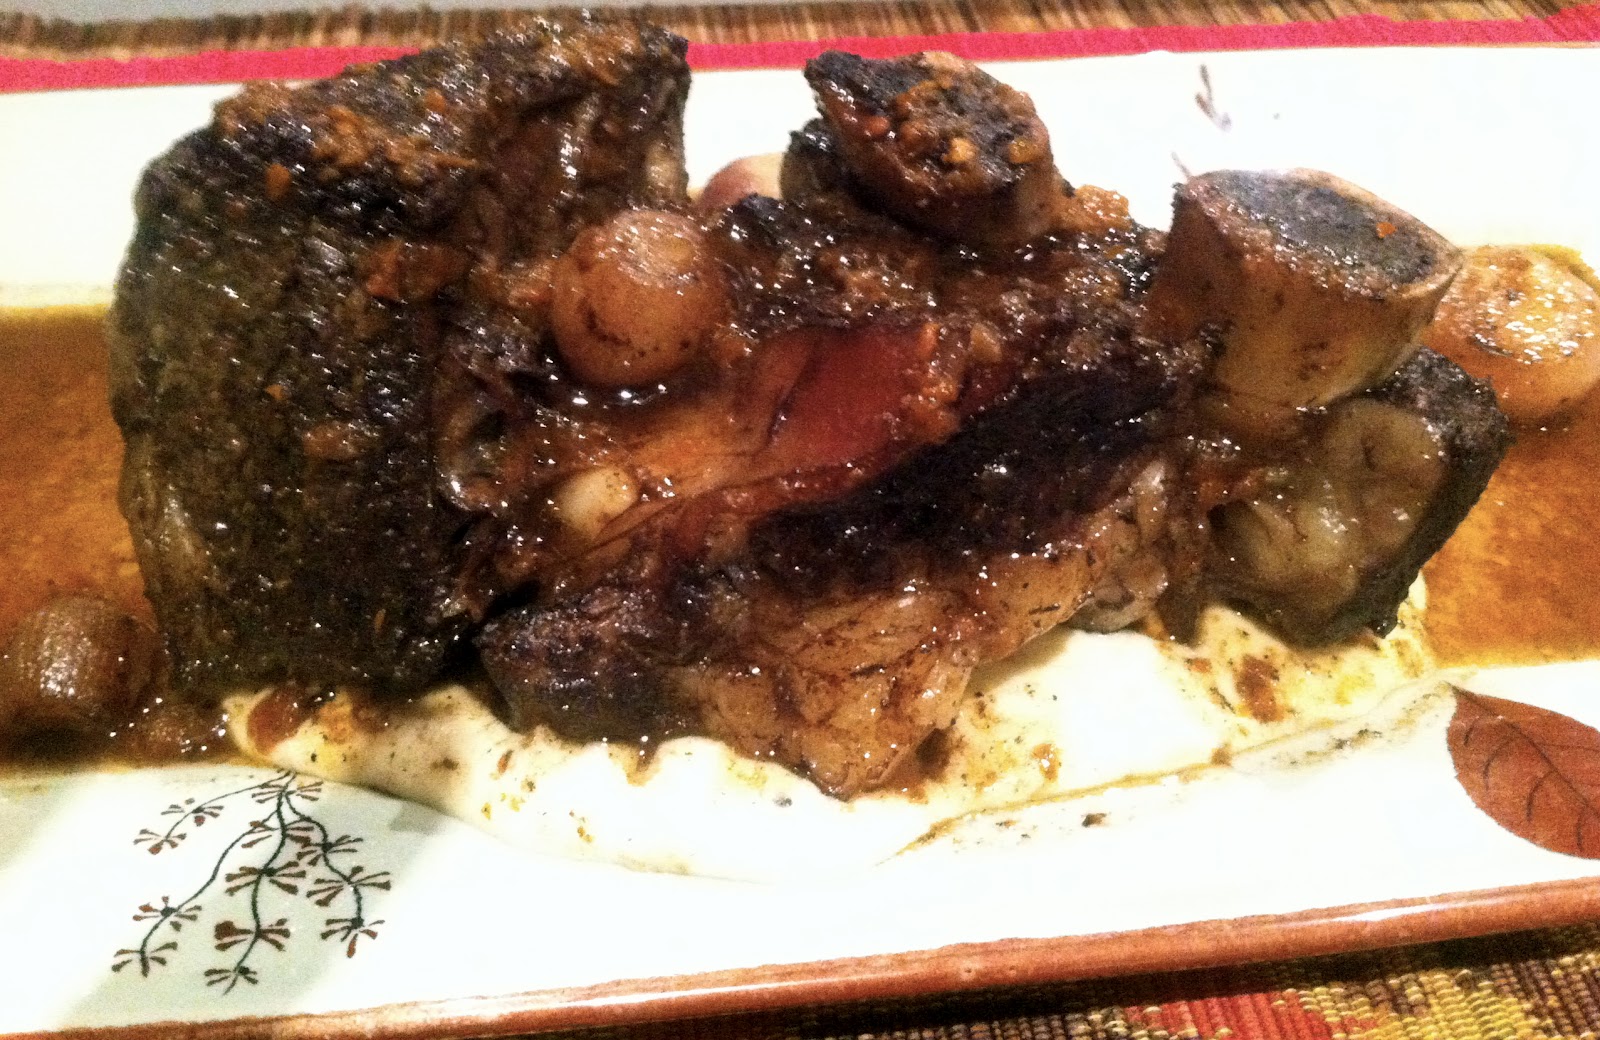
Espresso-Cocoa Short Ribs: You Had Me At Hello

Annually, over 141 million people trade Valentine's Day cards with each other. This weekend, millions of couples worldwide will be celebrating Valentine's Day. Many others will be waiting to pay a ridiculous amount of money for a Valentine's themed dinner on Tuesday, February 14th. I have always found it so outrageous that on this one day, a person feels that their love for their significant other can only be expressed through an overpriced dinner.

This year, I am challenging you to create this decadent, over the top espresso-cocoa short rib for your loved one. The thought, care and effort that goes into this dinner will be so much more special and memorable than paying $100 a head for dinner at a public restaurant. And honestly, how can a dish that has the trifecta (espresso, cocoa, and beef) be anything but amazing.
It may not be the prettiest dish. But the bitter sweetness from the espresso and cocoa paired with the outrageously succulent short rib makes for a standout dish that will make you say, "Wow." Braised in a smooth, berry pinot noir broth for several hours over low heat, this is a great dish to cook the day before and then reheat it an hour before you want to serve it to your special guest. It only gets better as it sits in the fridge overnight!


I made a creamy, purée potato to lay the short rib on and spooned the remaining sauce the short rib braised in over the entire dish. When you take a bite of the beef with the potato drenched in the sauce, you can't help but close your eyes in orgasmic delight. It is just that good. It is a time intensive, but relatively painless, labor free dish. However, I promise the effort will be well worth it when you see the blissful look on your partner's face.

Toast the night away with the remainder of the red wine that you used for the short rib....and then finish it off with a glass of bubbly. It's a night for indulgence!

Hope everyone has a great Valentine's Day weekend with your special someone! Make sure to come back on Monday for dessert. See you then!

ESPRESSO-COCOA SHORT RIBS
Serves 2

INGREDIENTS
1 1/4 lb beef short rib
2 tbsp instant espresso granules
2 tbsp unsweetened cocoa powder
2 tbsp canola oil
2 cloves whole garlic, skin removed
6 pearl onions, blanched and skin removed
1 bay leaf
1 cup red wine preferably Pinot noir
1 1/2 cups beef broth
1/4 tsp unsalted butter
Salt and freshly ground black pepper

DIRECTIONS
1. Remove short rib from fridge and bring to room temperature for an hour.

2. In a small mixing bowl, mix together espresso and cocoa. Coat all sides of short rib with the mixture.
3. In a large braising pan, heat oil over medium high heat. Add short rib and sear each side for approximately 5 minutes per side. Then, add garlic, onions, and bay leaf to beef for a few minutes. Do not let garlic brown.

4. Slowly pour in wine and broth to the pan, bring to a boil. Then bring heat to low, cover and simmer for approximately 2-2 1/2 hours. Just leave it alone, nothing needs to be done. In the meantime, you can purée the potatoes or whatever side you choose to serve it with and decorate the table.

5. The short rib will be done when you see the meat start pulling away from the bone. It should literally be falling off the bone.

6. Remove short rib from pan. Add butter to remaining sauce over medium high heat, season to taste with salt and pepper. Bring to a boil and then tyrn off heat.

7. To plate, spoon purée potatoes on center of the dish, top with the short rib and pour reduced sauce over the entire dish. Serve immediately.