Tuesday, June 19, 2012

Magical Lemon Curd

Lemons are the most versatile ingredient in the kitchen.  I use it for almost every recipe I make whether it be savory or sweet. If a dish is bland, I add some fresh lemon juice and all of a sudden "wow"! Too sweet, add some lemon juice. Too greasy tasting, add some lemon juice. Make my pancakes taste extra yummy and moist, add some lemon juice. Ensure I don't get scurvy (honestly, I don't even know what that is!), have some lemons. It really is the magic ingredient for so many things.

But the best way to use lemons is in a lemon curd.  Traditionally an English condiment, it is typically used for afternoon tea to top scones and bread in replacement of jam.  Sweet and sour, it is mouth puckeringly good.  There are so many various ways of using lemon curd, whether it is on top of your morning pancakes, lemon bars, cheesecake, a glaze for lemon chicken or simply spread lavishly on a slice of crusty toast. It was pretty good just by the spoonful.

Here, I used it swirled into some Greek yogurt topped with sweet summer berries.  Later on this week, it will share the spotlight in a special birthday cake I am creating to celebrate my friend's 30th birthday in the Hamptons. Make sure to check back next week for that!


The gorgeous intense yellow color of the lemon curd is a welcome addition to any dining table or perhaps in a hostess gift basket.  Once you learn the base recipe, you can easily substitute the lemons with grapefruit or blood orange.  This can easily be made a few days ahead and will keep in the refrigerator for a couple of weeks.

MAGICAL LEMON CURD
Makes 3 cups


INGREDIENTS
2 tbsp lemon zest (roughly 2 lemons)
1 cup fresh lemon juice
1 cup sugar
4 large eggs
Pinch of salt
1 stick unsalted butter, cut into tablespoon pieces

DIRECTIONS
1.  Whisk together zest, juice, sugar, eggs and pinch of salt in a large saucepan over low.  Add butter and mix together, whisking constantly to prevent eggs from curdling.  


2.  Continue whisking until consistency is thick and easily coats the back of a spoon.  This process should take 20-25 minutes. Be patient! It will thicken further once refrigerated.


3.  If curd has bits of egg or lumps in mixture, strain before reserving it in a resealable container.  That was unnecessary for mine. Place saran wrap or parchment paper on top of the curd to avoid a layer of skin to form when cooling. 


4.  Refrigerate until ready to use for whatever you please. 

*Adapted from Gourmet, April 2011

Friday, June 15, 2012

Father's Day Veal Osso Bucco with Gremolata

Sometimes it feels like one revolving holiday after another.  And Father's Day has somehow snuck upon us this coming weekend.  So all you daddy's girls cooking for your father this weekend, forget the barbecue and try my rich veal osso bucco with a refreshing gremolata!  Gremolata is usually nothing more than a topping of garlic, lemon, herbs and olive oil. Here, it is enlivened even more with the addition of lavender in the gremolata and to braise the veal.  The subtle floral aroma brightens the dish from a hearty winter dish to a special summer entrée.


My dad is a meat and rice kind of guy.  He loves his steak, pork belly and lamb.  He's usually pretty easy to please if you have any of those items on the plate.

Originally, we headed to Costco to pick up some steak to throw on the grill.  But that immediately changed when his eyes fell on these gorgeous veal shanks.

When I think of veal shanks, I immediately think osso  bucco.  Braised for several hours on the stove with tender, fall off the bone meat, it is an over-the-top dish that will make your dad (and diners!) salivate when you bring it to the dining table. Once you put it on the stove, just let it simmer on low and let it go and have a glass (or two) of wine while you wait for it to finish.

I love the citrusy-garlic of the gremolata which adds a bit of bite and wakens up all of your taste buds. The heat from the piping hot osso bucco releases all of the lovely ingredients in the gremolata.  Who needs to go to a restaurant when you have this osso bucco bubbling away at home? I served my osso bucco over some creamy mashed potatoes with some crispy, oven baked asparagus.  The reduced red wine broth the shanks cook in gets a deep, complex flavor from the long simmer on the stove and thickens slightly from the flour on the veal to create a tasty gravy to sop everything up.  With a bottle of red wine (or be a rebel and drink a crisp bottle of Sauvignon Blanc!), it is the perfect Father's Day meal.  I know my dad finished off his plate.  And even better, the dog got in on it too with the leftover shanks.

VEAL OSSO BUCCO WITH GREMOLATA
Serves 4-6

INGREDIENTS
1 tbsp canola oil
1/4 cup flour
6 veal shanks, bone-in
4 whole cloves garlic, peeled
1/2 tsp dried lavender
3 medium size vine grown tomatoes, roughly diced
2 stalks celery, roughly chopped
2 carrots, peeled and roughly chopped
2 tbsp tomato paste
1 cup beef broth
1 cup red wine (used Shiraz Cabernet)
1 bay leaf
Zest of 1 lemon
Salt and freshly ground mixed peppercorns to taste

For gremolata:
2 cloves garlic, minced finely
Zest of 2 lemons
1/4 cup flat-leaf parsley, chopped finely
1 tsp dried lavender, crushed
1/2 tsp Maldon or flaky sea salt

DIRECTIONS:
1.  In a large braising pan, warm oil over high heat.  In a medium bowl, mix together flour and season liberally with salt and pepper.  Add shanks into flour mixture and then shake off excess flour. Carefully place shanks into the braising pan and brown for 4-5 minutes on each side. Remove from pan and reserve on a plate.

2.  Lower heat to medium-high and add garlic, lavender, tomatoes, celery and carrots.  Stir together until light golden brown. Do not let the garlic burn! Add tomato paste, broth, wine and bay leaf and bring to a boil. Add shanks back into the broth mixture and lower heat to low.  Cover and simmer for at least 1 1/2 hours.  The meat should start pulling away from the bones.


3.  For gremolata, place all ingredients in a small bowl and mix together.  Reserve in refrigerator until ready to use.

4.  Add lemon zest to veal, season with salt and pepper if needed and continue braising for another 20-25 minutes.  Remove from heat. For a more home-style approach, serve it at the table in the braising pan.  Otherwise, serve the osso bucco in a large platter on top of mashed potatoes and top with broth/gravy and gremolata.


Wednesday, June 6, 2012

Spiced Strawberry-Rhubarb Ice Cream Cookies Sandwiches

For the past couple of years, I've eyed that huge red celery-like vegetable called rhubarb with some skepticism at the farmers market and grocery store. How could that possibly taste good in desserts? I just didn't get it because I hadn't tasted it yet.


I tend to bring in any leftovers from my kitchen experiments to my friends and co-workers.  Lucky them, yes?  I am a thorn to the side of my friends in the office who seem to be consistently dieting. Most of the time, they watch on enviously or take a small morsel to test instead.

2012 has been the year of experimentations and trying new things. So of course I had to finally try my hand at using the rhubarb I had picked up at the farm last week. I have seen several variations with rhubarb in savory dishes as well as sweet. But I was really intrigued in using it in a dessert and particularly a compote which is basically a thinned jam-like fruit topping. Since rhubarb has a more acidic, tart taste it can usually be found paired with summer's luscious, sweet strawberries. It's still early in the season, but the ones I've picked up are already like nectar with juices dripping down the side of your mouth. Thus said, a strawberry-rhubarb compote was the natural choice! The intense red of the finished compote is gorgeous.

My original concept was to offer up these delicious, not overtly sweet, spiced strawberry-rhubarb cookies. It gets a ton of flavor from the warm spices I added to the dry ingredients. Everything you might find in apple pie like cinnamon, nutmeg and cloves.  It makes  your house smell insanely delicious and the perfect smell to greet dinner guests.  But that original concept got revamped slightly when one of my co-workers said, "These would be great as an ice cream sandwich!"  Ding, ding, ding!  How did I miss something so obvious?

Ice cream sandwiches. When I was a kid growing up in the suburbs of New Jersey, this meant the mushy, rectangular-shaped Good Humour ice cream sandwiches you can buy in the freezer section of your supermarket or your neighborhood Mister Softee ice cream truck. It was always somewhat melting when you bought it from the truck and I would be frantically licking at the vanilla ice cream oozing down my fingers before it melted onto the sidewalk in the blazing summer sun. But there was something about those sticky fingers and inevitable globs of ice cream on your shirt and shorts that made the entire experience sublime. To this day, I can't hear the familiar rinky dink song heralding the arrival of the ice cream truck without wanting to run down the stairs and buy a cone or ice cream sandwich...preferably with a handful of quarters, nickels and dimes; in desperate situations, those pennies definitely made their appearance!


These days, there are so many fancy ice cream sandwiches everywhere from the delights of Coolhaus to my ultimate favorite Big Gay Ice Cream truck. I love them all. And while this might not be the ice cream sandwich of my childhood. It is the ice cream sandwich of my adulthood. I mean really.  A nutty, caramel browned butter crumble dipped alongside the edges of two strawberry-rhubarb cookie filled with creamy vanilla gelato? It's a no brainer.

This over the top spiced strawberry-rhubard ice cream cookie sandwich may not be bikini friendly with summer just around the corner. But man, is it good!

The recipe has several steps that may look a bit intimidating.  But if you make each component separately on different days and put the sandwiches together a few hours before your guests arrive, it is only a matter of minutes to put together something so special. The one thing I would change the next time I made this is to follow Chocolate and Zucchini's advice of using a large pan with good size flat surface to allow the crumble to crisp up a bit more. As you'll see in my photos below, I used a small sauce pan.

You will definitely have leftovers of the compote and crumble. Use the crumble to top some spiced fruit for a cobbler and then drizzle with the compote when serving on top of the ice cream. I like to use my compote over pancakes/waffles instead of syrup. You can also use it in a refreshing summer cooler with just some club soda or gin/vodka. Cheers to the early dog days of summer!

SPICED STRAWBERRY-RHUBARD 
ICE CREAM COOKIE SANDWICHES
Makes 12 sandwiches

INGREDIENTS:
For Strawberry-Rhubarb Compote (makes 1 cup):
1 stalk rhubarb *
1 1/2 cup strawberries
1 tsp ground Saigon cinnamon
1 tsp ground cardamom
1/4 tsp ground cloves
1/2 tsp ground nutmeg
1/2 fresh vanilla bean pod, seeds removed
1/8 tsp ground black pepper
1/4 tsp salt
2 tbsp sugar
1/2 lemon, juiced
*Note that the leaves of rhubarb are toxic. Do not ingest.


For Spiced Strawberry-Rhubarb Cookies (makes 24 cookies):
2 cups all-purpose flour, spooned and leveled
1 teaspoon baking powder
1/2 teaspoon salt
1/4 teaspoon baking soda
1 tsp ground Saigon cinnamon
1/2 tsp ground cardamom
1 tsp ground ginger
1/2 cup strawberry-rhubarb compote (recipe above)
1/4 cup candied ginger
6 tablespoons unsalted butter, room temperature
3/4 cup sugar
1 large egg
1 teaspoon pure vanilla extract
1/4 cup heavy cream
Adapted from Martha Stewart

For brown butter crumble (makes 2 cups):
3/4 cup white flour
1/4 cup almond meal
1/4 cup light brown sugar
1 green cardamom pod, finely crushed in a mortar or 1/4 tsp ground cardamom
1/4 teaspoon ground Saigon cinnamon
Pinch of freshly ground black pepper and sea salt
4 tbsp unsalted butter, diced
Adapted from Chocolate & Zucchini

DIRECTIONS
1. For compote, add all ingredients into a medium pan over medium-high heat. Bring to a boil and then let simmer for 3-5 minutes until the rhubarb is softened and juices released. Remove from heat and add lemon juice at the end to brighten the flavors. This can be made a few days ahead and refrigerated.


2. For cookies, whisk all dry ingredients together in a medium mixing bowl.

3. In a mixer, cream sugar and butter together until fluffy yellow crumbles. Add egg and incorporate. Then add cream and vanilla extract. When fully incorporated, slowly add in dry ingredients until all mixed. Remove from stand and using a non-stick rubber spatula, fold compote through the cookie dough mixture. You can add more fruit if you'd like. Make sure to mix it all throughout.


4. Preheat oven to 350 degrees Fahrenheit. Drop one tablespoon of dough on pre-greased baking sheet about 1 inch apart.  You should be able to fit at least 12 per sheet. Bake for 20-25 minutes until light golden on outside and still slightly soft in the center. Cool and put to side until ready to use.


5.  In a medium mixing bowl, add all dry ingredients for the crumble. Whisk together.


6.  In a large sauce pan, add butter over medium heat and swirl every so often.  It will bubble furiously or as Clothilde from Chocolate and Zucchini writes "sing"! Once it starts turning slightly brown, watch it carefully to make sure it doesn't burn on the bottom.  I had small little bits of caramelization on the bottom that I used up and added a nice caramel taste.  When you are able to smell the rich, deep caramel of the brown butter, you know it is done.


7.  Immediately add the dry ingredients at this point and use a rubber spatula to mix wet and dry ingredients together until it forms a crumbly texture.  Let cook for a few minutes before stirring to allow the bottom to brown and crisp up.  This will allow the flour to cook up to use for the ice cream sandwich.  Raw flour = bad. Reserve until ready to use.


8.  To form the sandwiches, take two cookies and scoop gelato on the flat surface of one cookie.  Top with the second cookie. Roll the edges in the crumble mixture.  The gelato should allow it to stick.  Place in freezer for at least a few hours until ready to serve. Defrost a few minutes before serving to allow it to soften a bit.

9.  Plate as you'd like! Get creative, wrap each one individually in parchment paper and serve in a metal bucket for your guests to grab or more elegantly as my presentation below.


10.  Lastly, always test before serving! Just to make sure it tastes good of course.  ;)   YUM.


Thursday, May 31, 2012

Creamy Harissa-Corn Soup

With summer comes along an ingredient I can eat all year round: corn!  I am so blessed to have fresh Jersey corn available so easily and in such abundance. These wonderful packets of joy have become such a prevalent part of our modern lives that you'll find it not only on your dining table, but in your fuel, animal feed and even penicillin! Isn't it great what nature can provide us with?!


Right now, our Jersey corn is at its peak: sweet and succulent. So when I stopped by the grocery store this week and saw a sale on corn, I knew I just had to stock up.  Some of them were boiled and I roasted a few Taiwanese-style (more on that later) and the last few I saved for this creamy harissa-corn soup.

I love the taste of corn on its own, so I tried to keep this recipe as simple as possible with as few ingredients to keep the pure corn taste distinguishable.  I saved the kernel-less cobs to steep in the milk and give the entire soup an even more intense corn taste. Make sure to reserve any corn milk (juices from when you cut the kernels off cob) to add to the soup. You do not need to toast the corn kernels if you do not have the time and just purée it raw.  However, I think toasting it brings the natural sweetness to the forefront and adds an additional caramelization taste.

When you top the soup with the harissa paste, do use it with caution.  A small dollop can pack quite a wallop!  The flavors come together really nicely in this quick and easy soup.  You can still taste the wonderful sweetness of the corn through the heat of the harissa. The créme fraîche adds a nice cool finish.


CREAMY HARISSA-CORN SOUP
Serves 4

INGREDIENTS
8 ears of corn, kernels removed and cobs reserved
4 cups 2% milk
2 bay leaves
3 cloves garlic, whole and peeled
1 tbsp canola oil
2 tbsp granulated sugar

1 1/4 tsp salt
1/2 tsp freshly ground black pepper


Harissa paste, to taste

Créme fraîche  or Greek yogurt
1 tbsp snipped flowering chives or chives

DIRECTIONS
1. In a medium stockpot, add corn, milk, bay leaves, and garlic.  Bring to a boil on medium-high heat and then lower to low.  Simmer for 20-25 minutes to allow the flavors to come together.

2.  While the corn broth is simmering, toast corn kernels in a large sauté pan with canola oil on high heat for approximately 5 minutes until golden brown, stirring occasionally. Remove from heat until ready to use.

3.  In a blender, add toasted kernels, corn broth and sugar.  Make sure to remove the bay leaf and garlic cloves from the broth. On high, purée the mixture for several minutes.  Add salt and pepper slowly and adjust seasoning to taste. I like to leave it slightly chunky for a nice texture, but you can purée till smooth if you prefer.

4.  Serve immediately in a soup bowl. Top with a dollop of créme fraîche, harissa paste and chives.


Saturday, May 26, 2012

Asparagus-Goat Cheese Tart

As I mentioned in an earlier blog the other week, I have been commuting to New York from New Jersey for the next few weeks cat-sitting for my parents.  So when I'm in Jersey, I am always trying to find something fun and interesting to do to keep myself amused.  It is a great time for me to experiment in the kitchen since my parents have a rather fair size kitchen that was renovated a few years back.  My only complaints is that they have bare minimal cooking utensils and gadgets.

I had thought ahead this time around and packed a few things with me this time around that I could easily carry to/from NYC including my handheld immersion blender that I used for my chilled fiddlehead-asparagus soup and star-shaped popsicle molds for my upcoming Memorial Day blog (stay tuned for that!).  However, I was still missing a few essentials.  So after a quick trip to Target and HomeGoods, I happily unpacked my new kitchen tools for my Jersey kitchen including an inexpensive new food processor (used in this recipe!) that works surprisingly well.

So last Thursday, I checked out the weather forecast and saw nothing but beautiful sun and 80 degree weather up through the weekend. I hadn't been down to Princeton in a long time and I have a few favorite spots there that I love. It's the perfect spot to spend a sunny afternoon with the outdoor shops and restaurants in Palmer Square, right on the outskirts of the prestigious Princeton University.  Another bonus is that I can take my pup shopping with me here and have him bask in the glory of the weather with me!


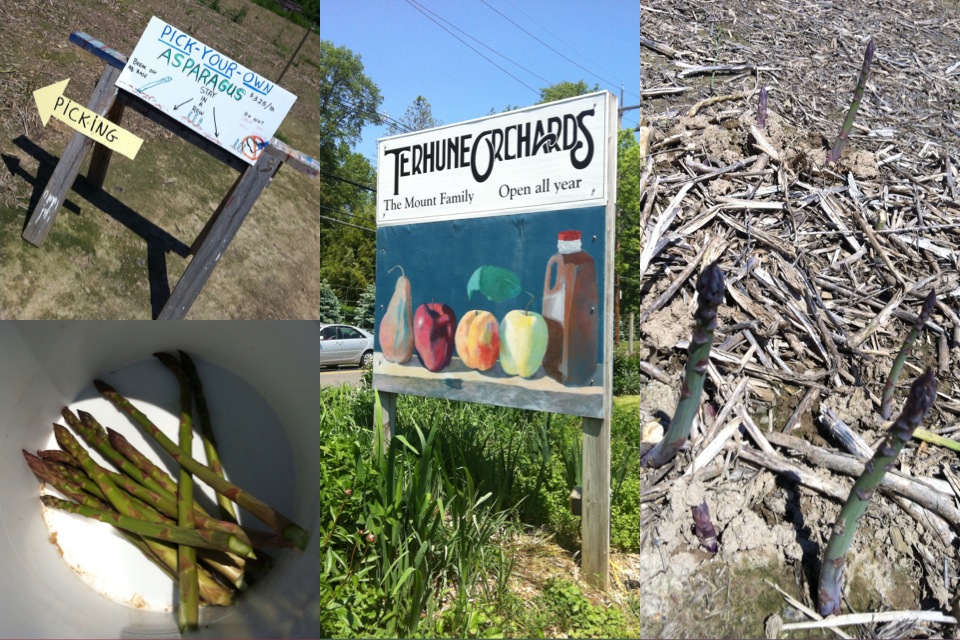
Princeton also has some great farms in the area where we usually go apple picking. One of my personal favorites is Terhune Orchards, famous for their apples and apple cider. I checked out their website to see what seasonal produce they were featuring and lo-and-behold, I read: "Pick your own asparagus." Yes. That's right. Pick my OWN asparagus.  It was too good to be true! I have never picked my own asparagus, much less seen it grown from the ground.  I am a city girl after all. I've tried my hand at growing my own herbs in the past, but my sister and I concur that our entire family has a black thumb. We've killed everything ever given or bought including a sad little cactus plant.  :(    It is a sad, but true, fact.

So, the next morning I packed up the dog and drove the 22 miles to Princeton, enjoying the cool breeze and warm sun on my face along the relatively quiet, winding and hilly roads. We did a little shopping and eating in Princeton's Palmer Square before heading out to the farms. But then it was onwards to Terhune Orchards and Griggstown Quail Farm. See my pictures below of my first experience picking asparagus!
The asparagus was everything I imagined: crispy, yet tender and sweet.  I featured it in my soup and had thought to do it raw but didn't pick any asparagus thick enough for that purpose.  Roasted asparagus is always a great way to use up your delicious spring asparagus.  This super easy and scrumptious asparagus-goat cheese tart is the perfect light dinner to have with just a side of fresh greens.  It is also great to serve as an appetizer or hors d'oeuvres. The addition of goat cheese was a great complement as the tanginess in the cheese brought out the sweetness of the asparagus.

For my pesto sauce, I didn't have any of my usual ingredients and was too lazy to go out to the grocery store.  So after scrounging through cupboards and the refrigerator I was able to put together what I am calling my "pantry pesto" which was just tasty.  I loved the addition of the sundried tomatoes which added an unusual sweetness to the pesto.  If you already have some pesto on hand, feel free to use that instead. But do try your pesto with some sundried tomatoes next time!

ASPARAGUS-GOAT CHEESE TART
Serves 2-3 (as a main dish)

INGREDIENTS
Pantry pesto:
1/2 cup cilantro, roughly chopped
1/2 cup parsley, roughly chopped
12 mint leaves, stems removed
8 sundried tomatoes
1/4 cup toasted walnut
1 clove garlic, whole
1 cup extra virgin olive oil
Salt and freshly ground black pepper to taste

Tart:
1 sheet puff pastry
10 stalks asparagus
4 tbsp pantry pesto
1 goat cheese log, rolled into small balls, and then sprinkled randomly
1/4 cup shredded Parmesan
1 tbsp extra-virgin olive oil
Salt and freshly ground black pepper

DIRECTIONS
1.  For pesto, add all ingredients in a food processor. Pulse on high for a few minutes until it is fully mixed.  Add more oil if it is still too thick.  I did not make the pesto very thin since I wanted it more like a paste.  Refrigerate until ready to use.

2. Remove puff pastry dough from freezer and defrost for 40 minutes until soft enough to use.

3. Preheat oven to 400 degrees Fahrenheit.

4.  On a lined pre-greased baking sheet pan, unfold the dough and roll up each edge.  Spoon pesto onto dough and evenly spread to the edge. Line asparagus lengthwise on the dough, flipping every other asparagus the other way.

5. Top with parmesan and goat cheese. Brush edges of pastry with oil for a nice golden crust. Sprnkle with salt and freshly ground pepper. Bake for 20 minutes.

6. Cut into squares and serve immediately.


Wednesday, May 23, 2012

Chilling this Memorial Day Weekend with Summer Sangria Popsicles

While the first official start of summer is not until June 20th this year, most people in the US wait eagerly for Memorial Day weekend as the kick-off for summer.  Tropical beach getaways, weekends in the Hamptons, barbecues, dips in the pool, outdoor happy hours, flip flops, and best of all...summer hours. Oh yes, those companies who have summer hours/summer Fridays are envied by those poor employees who are forced to start their weekends at 5pm vs 2pm on Fridays when the sun is out in full force and calling to you. (Honestly, it's just cruel to not enforce summer Fridays with official legislation!)


So, this Memorial Day weekend, whatever your plans are, keep you and your guests cool with these summer sangria pops filled with juicy, sweet pieces of blackberries, strawberries, peaches, and mangoes.  Soaked overnight in a mixture of good quality vodka and St Germain (a sweet Elderflower liqueur), each little piece of fruit pops a small concentrated amount of liquor on your tongue.  It is delicious and refreshing on a warm, pre-summer afternoon with a hidden kick. So don't let your guests overindulge in these! It may not taste very sweet or strong, but have more than a few and your guests will be giddily dancing the afternoon away.

I love these star-shaped popsicle molds as they bring back a bit of nostalgia with the rocket popsicles I used to have growing up from the neighborhood ice cream truck. Use whatever fruit you might have on hand and enjoy eating.

Have a safe and fun Memorial Day weekend wherever you are!
SUMMER SANGRIA POPSICLES
Makes 10-12 popsicles

INGREDIENTS
1 mango, peeled and cut into small cubes
1 peach, cut into small cubes
1/2 cup strawberries, thinly sliced lengthwise
1/2 cup blackberries, thinly sliced lengthwise
1 1/2 cup vodka (I used Ketel One)
1 cup St Germain
2 cups club soda

DIRECTIONS
1.  In a large pitcher, add fruit, vodka and St Germain.  Allow the fruit to macerate for at least 3 hours if not overnight. Refrigerate until ready to use.
2. Remove pitcher from refrigerator and add club soda.  Stir briefly to mix together.

3.  Carefully pour the liquid into the popsicle mold 3/4 full.  Then, using a spoon carefully add a mixture of fruits until full. Place molds in freezer overnight. 

4.  To remove popsicle from mold, rinse warm water over the mold to release.  Squeeze on sides of the mold gently to work on getting it looser, jiggle carefully and voilá, it's free! Freeze until ready to serve or eat immediately.


Saturday, May 19, 2012

Chilled Fiddleheads-Asparagus Soup

It's unbelievable to think after the ups and downs Mother Nature has played on us this year that summer is actually near. With the sun blazing today, temperatures hovering around a perfect 80 degrees Fahrenheit and a cool breeze it is the perfect pre-summer Saturday.

In honor of this gorgeous weather and it being May 19th, Jamie Oliver's Food Revolution Day, I decided to make a zesty, cooling chilled fiddleheads-asparagus soup.
Before I get into fiddleheads and what they are, I want to briefly explain what today's Food Revolution Day is all about.  In 2010, ABC launched a groundbreaking reality show following Jamie Oliver's quest to tackle America's obesity problem and get our kids healthy by getting into the schools and teaching kids how to eat healthy and where their food came from.  The first season started off in Huntington, West Virginia, statistically the unhealthiest city in the US. Season two took him to Los Angeles, California, home to the 2nd largest school district in the country. It was heartbreaking to hear and see the stories of these children and their families suffering from obesity and even more shocking to see how several of the kids were unable to identify everyday fruits and vegetables or even know where their meat originated. Unfortunately, despite the compelling story ABC cancelled the show half-way through the second season due to lack of commercial support.  What sprouted from the show though was an overwhelming support worldwide for Jamie's Food Revolution to get the US to initiate policies to feed our children healthier food within the school system. This is a monumental task.  So in the meantime, the Food Revolution is working on the local grass-roots level by setting up free kitchens and cooking lessons within communities to teach children and adults how to start cooking. Please take a minute to check out the website and sign the petition to show your support for this incredible initiative.

Now, back to fiddleheads. What are they exactly? I had wondered the same thing myself for the last few seasons and have just looked at them as an oddity.  A vegetable taken from the furled fronds of a young fern, fiddleheads usually appear in the early springtime and look like a tightly curly "q", similar to a snail shell. Used both in Asian cooking and North American, fiddleheads are extremely versatile in its culinary use.  I am extremely interested in trying it in an Indonesian dish called gulai paku which are fiddleheads cooked in a rich coconut sauce mainly spiced with lemongrass, galangal, chili pepper and turmeric leaves. I will save that for another day though!  Tonight, it will be featured in my chilled soup!  Fiddleheads have the sweet, lemony, grassy taste of asparagus which is why I paired them here with asparagus in my cold buttermilk-based soup. The use of the buttermilk gave the soup a nice tang with a bit of richness from the créme fraîche added at the very end.


This chilled fiddlehead-asparagus soup is the perfect, refreshing light lunch or starter on a hot summer day. You can also serve them for your next cocktail party served in short shot glasses, topped with a sprig of fiddlehead or asparagus on a toothpick. Tonight, mine will be enjoyed al fresco with a glass a cool white wine and my marinated all-natural, free range poussin from Griggstown Quail Farm. What a perfect way to close the first Food Revolution Day!


CHILLED FIDDLEHEADS-ASPARAGUS SOUP
Serves 2

INGREDIENTS
1 tbsp grapeseed oil
1 cup fiddleheads, cleaned thoroughly and brown ends trimmed
1 cup asparagus, cut 1-inch long
1 clove garlic, smashed
1/2 cup vegetable stock
3/4 cup buttermilk
1 tbsp Worchestershire sauce
Salt and freshly ground black pepper to taste
2 tbsp créme fraîche (optional)
Chives (optional)

DIRECTIONS
1.  In a medium size pot, heat oil over medium high heat. Add fiddleheads, asparagus and garlic and saute until slightly softened. Add vegetable stock and bring to a boil. Then lower heat to low and simmer for 5 minutes.
2.  Remove from heat and add buttermilk, Worchestershire sauce, salt and pepper.  Using a hand-held immersion blender, process until solids are all liquified and soup is smooth. This will take several minutes.
3.  Chill for at least 3 hours before serving.  Ladle into a bowl, add 1 tbsp créme fraîche and chives per bowl if desired. Serve chilled, not at room temperature.